Introduction
The original release of RDS had no ability to create a native database backup or to restore from a native backup (i.e. a .bak file). This
was a major restriction as it meant that an individual database could only be moved in or out of RDS by scripting it up using tools such as
the SQL Server Import and Export Wizard. This all changed in July 2016 when AWS announced that they had implemented support for
native backups in this article :
https://aws.amazon.com/about-aws/whats-new/2016/07/amazon-rds-sql-server-supports-native-backups/.
If you have your own on-premise database that you want to move to RDS you can simply back it up, upload it, and restore
it onto an RDS SQL Server. Equally if you want to copy an RDS database to your own local SQL Server instance (perhaps a
development machine) then you can do that too using backup and restore. You can also copy a single database from one RDS server
to another in the same way.
In my view this is a huge step forward, and gets rid of a major hurdle, especially if you are moving from on-premise
SQL Server to RDS hosted SQL Server. There are a few limitations which are outlined in this AWS article :
http://docs.aws.amazon.com/AmazonRDS/latest/UserGuide/SQLServer.Procedural.Importing.html ).
I'll now summarise the steps involved in backing up an RDS database and restoring it to a local SQL instance.
Creating a Backup of an RDS Database and Restoring it to an on-premise Database
The key steps involved in this are :
- Step 1 Create an S3 storage bucket in the same region, if you don’t have one already.
- Step 2 Assign the RDS SQL Server Instance to an option group containing the SQLSERVER_BACKUP_RESTORE option.
- Step 3 Run a special stored procedure to back up the RDS database to the S3 storage bucket.
- Step 4 Download the backup file from S3 to the local SQL Server, and then restore the backup to the local server using Management Studio.
I’ll explain the steps above in a bit more detail with screenshots below. Note that I've assumed in this article that your instance has been assigned to the
default option group, which occurs automatically when you create a new instance.
Step 1 : Create an S3 storage bucket
If you don’t already have an S3 bucket (which needs to be in the same region as the RDS instance) you can either create one using the
instructions on the AWS site
http://docs.aws.amazon.com/AmazonS3/latest/gsg/CreatingABucket.html
, or there is an option to do this while setting up the option group, which is described in the next step.
Step 2 : Creating the Option Group and Assigning to the RDS SQL Server Instance
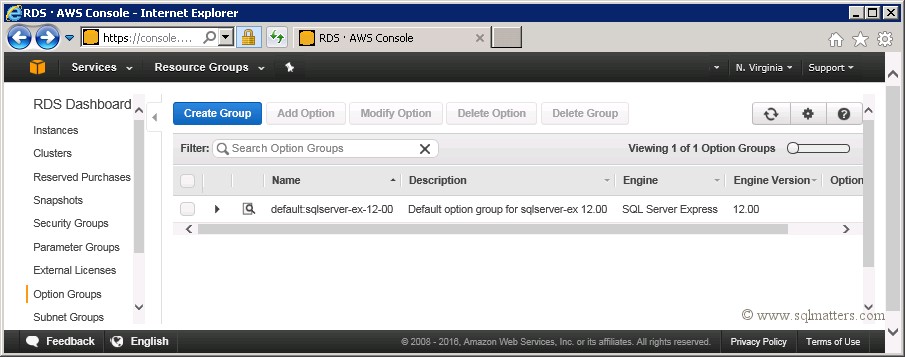
Once logged into the AWS console and on the RDS page, click on the 'Option Groups' menu on the left hand menu, then click on
the 'Create Group' button as shown below :
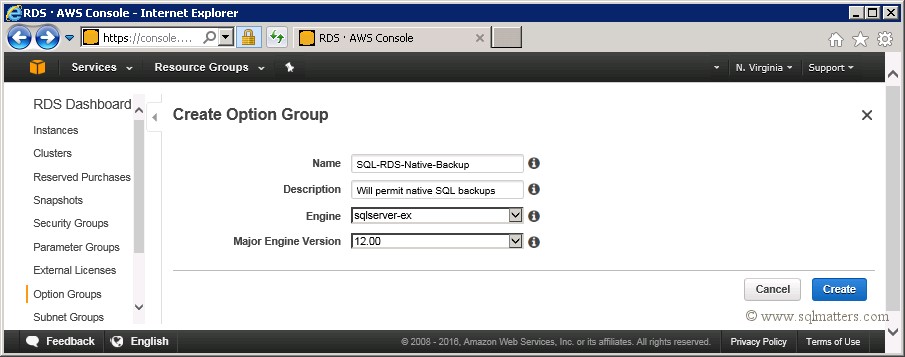
Enter details in the Create Option Group form as below. Note that the option group is specific to the database engine edition and version, so you
may need to alter the options accordingly if you are using different engine editions and versions :
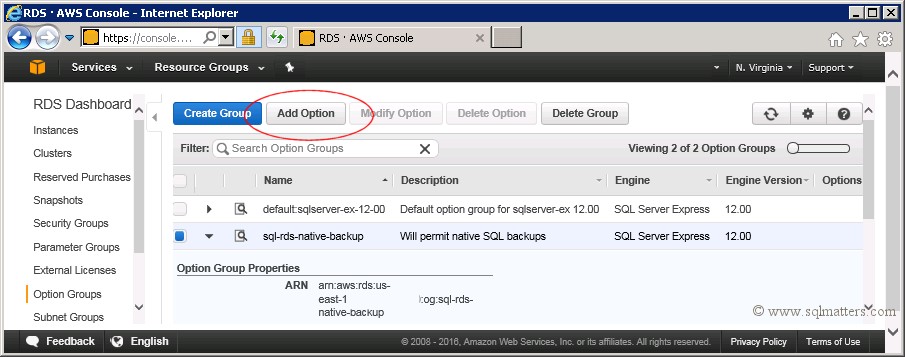
Once the option group is created you need to add the option to it, by selecting the Option Group we've just created
and clicking on the 'Add Option' button as shown below :
From the 'Add Option' window select the SQLSERVER_BACKUP_RESTORE from the drop down, and make sure ‘Apply Immediately’ is set to ‘Yes’. You’ll
also need to create an IAM role to link to your S3 bucket, by clicking the ‘Create a New Role’ hyperlink. Once you’ve done this, if you
don’t already have an S3 bucket then you can create one by clicking the ‘Create a New S3 Bucket’ hyperlink :
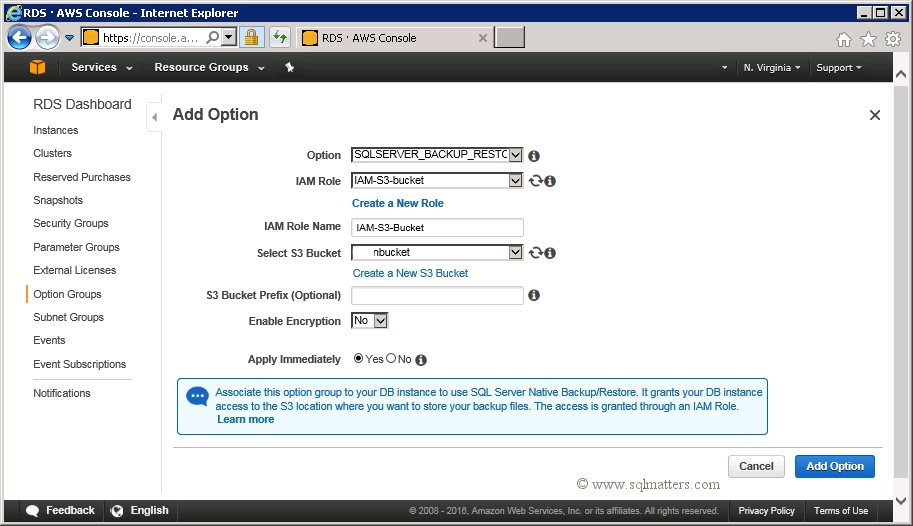
Click on the 'Add Option' button to create the option in the option group. Once that’s done you’ll be able to see the new
option group in the AWS console, under Option Groups :
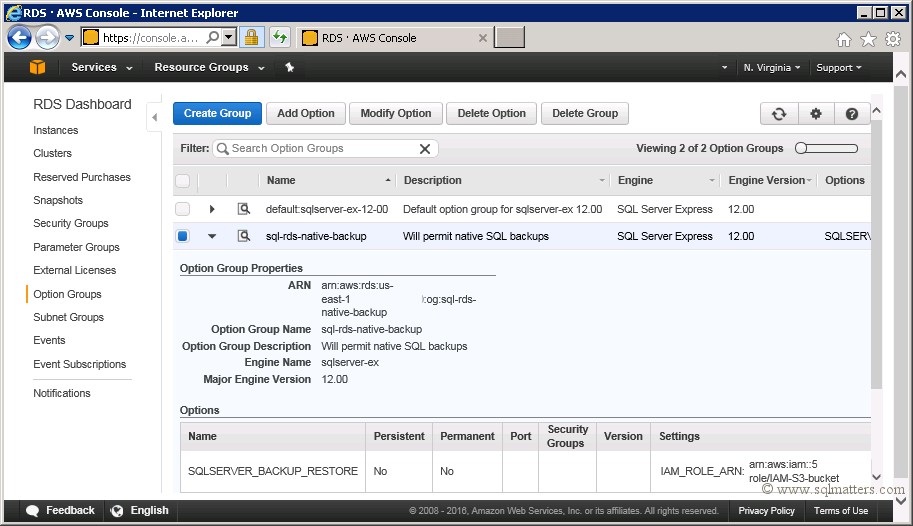
The final step is to change the option group for the RDS instance from the default one to the one we’ve just created. To do this
go to the ‘Instances’ menu item, select the relevant RDS instance, then click the ‘Modify’ link under ‘Instance Actions’ drop down. Scroll
down until you see the ‘Database Options’ area. Change the Option Group to ‘sql-rds-native-backup’ (or whatever you called it) and make
sure you click the ‘Apply Immediately’ checkbox, as below :
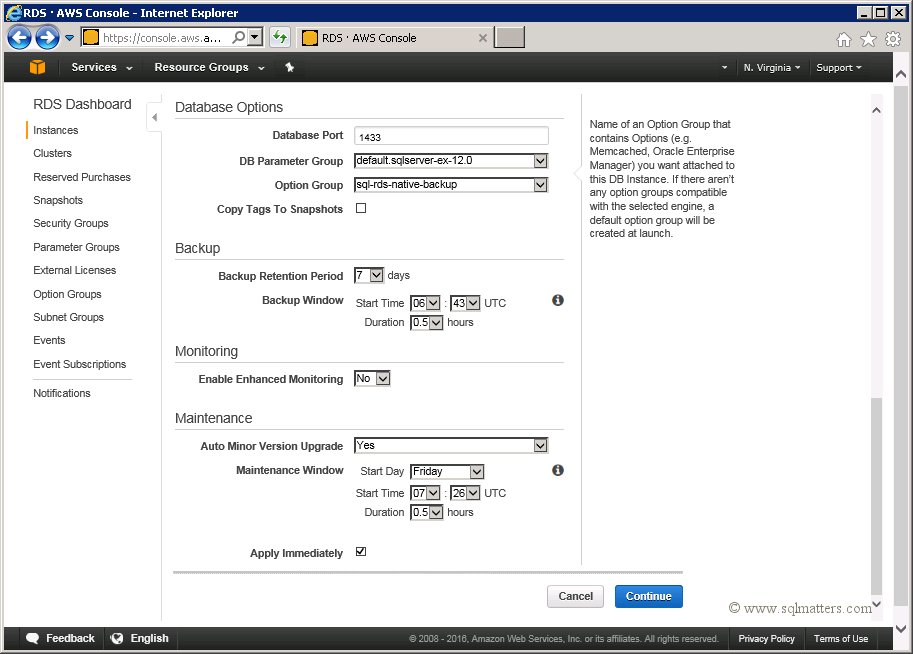
Click the 'Continue' button, which then completes the set up required in the AWS console.
A native backup file can now be created as and when required by running SQL statements, which I'll describe in the next step.
Step 3 : Running a Stored Procedure to Create the Backup
To start a backup of a database you’ll need to run an AWS stored procedure, specifying the database, S3 bucket name, and backup file/folder name, as follows :
-- Backup databases
exec msdb.dbo.rds_backup_database
@source_db_name='database_to_be_backed_up',
@s3_arn_to_backup_to='arn:aws:s3:::S3_bucket_name/folder/backup_name.bak',
@overwrite_S3_backup_file=1;
This returns immediately, but you can check on the progress of the backup using the following stored proc :
-- Check status of backup
exec msdb.dbo.rds_task_status @db_name='database_to_be_backed_up'
There are other options for these stored procs (for instance to encrypt the backup), which are documented on the AWS site.
Step 4 : Download the backup file from S3 to the local SQL Server
Once the backup is complete you can navigate to the S3 page on the AWS console. From there you should be able to navigate to the S3 bucket
and click on the relevant backup to download to your local server. Alternatively you can use a third party tool such
as CloudBerry Explorer for S3 (which I would recommend). The backup file can be restored to your local server
using SQL Server Management Studio.